📘 OWLogger Documentation
🔍 What Is OWLogger?
OWLogger is your window into the hidden corners of your world — whether it’s your attic, server rack, fermentation cellar, or chicken coop. It gives you real-time insights from 1-Wire sensors, without the complexity or security risks of traditional remote monitoring systems.
❗ The Problem with Conventional Monitoring
Modern remote monitoring often comes with serious drawbacks:
- 🔓 Digital Doorways: Inbound connections expose your network to security vulnerabilities.
- 📉 Flaky Connections: Spotty internet means gaps in your data — especially when you need it most.
- 🔄 Dynamic IPs: Your IP address can change unexpectedly, often during outages.
- 🕸️ Sensor Sprawl: Managing dozens of devices individually is a logistical nightmare.
- 📱 Untrustworthy Apps: Phone apps can be spoofed, and you never know what else they’re doing.
- 🔒 Vendor Lock-In: Proprietary systems can be abandoned or become expensive over time.
🚀 The OWLogger Solution
Forget complex network setups and risky configurations. OWLogger offers a secure, one-way data flow to a cloud server you control — giving you reliable, consolidated insights without compromising your privacy.
🌐 Key Benefits
- 🧠 You’re in Control: All devices and data are fully under your management.
- 💸 Low Cost: Even the cloud server is affordable — e.g., Kamatera offers VPS hosting from just $4/month.
- 🖥️ Virtual Private Server (VPS): Full access to a virtual cloud computer for storage, web access, and services like OWLogger or even a web store.
- 🌍 Pure Web Access: View your data from any browser — phone, tablet, computer, even a smart TV. No apps or installations required.
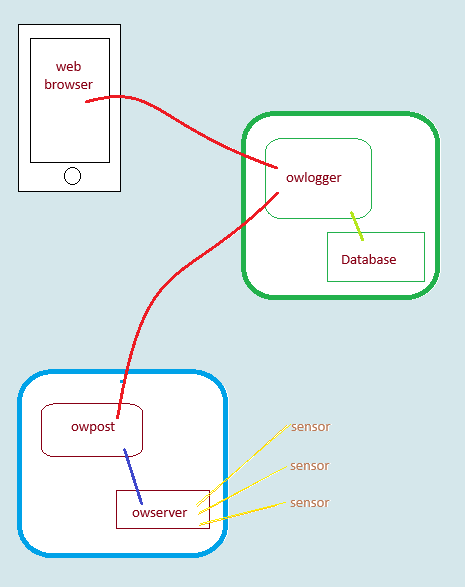
🧩 The Core Components
- Robust 1-Wire Sensors: Proven, reliable sensors with decades of continuous use.
- Pint-Sized Transmitter: A small device (like a Raspberry Pi) collects and forwards data securely.
- OWLogger Software: Open-source, customizable, and designed for simplicity and security.
🛡️ Why OWLogger?
OWLogger ensures a secure, outbound-only data flow to your cloud server. That means:
- No open ports
- No inbound connections
- No exposure to external threats
Just clean, reliable data — wherever and whenever you need it.
🛠️ Can you add on?
owgeneralpostlets you send any information to the logger, not just 1-wire data- Your data is stored in an
sqlite3file, so very readable and accessible - The web display is simple HTML – easily cutomizable
- All the programs are open source, well documented and in widely known python3
USE CASE
Basic premise
- Internal sensor readings to be monitored
- Internal network should not allow incoming access. Why?
- Dynamic IP addresses are not a problem
- Better security
- Comply with facility policy
- An external server is available
- Simple web viewing from any device
Some monitoring scenarios:
- Aquarium
- Beer brewing
- Wine cellar
- Pipes freezing
- Chicken coop
Types of data
1-wire sensors
owpost is designed specifically for 1-wire temperature and humidity
Other logging
generalpost posted any arbitray text string to the logging database
Requirements
Hardware
- 1-wire sensors
- a transmitting computer (like a Raspberry Pi)
- an external computer (or virtual private server)) to store data and provide web access
Services
- A Domain
- root access to your cloud server
Software
- Operating system – linux is tested and described
- owlogger programs
- owserver for one-wire
- Python3 with some modules
- Firewall and reverse-proxy
Note: the software is free and easily install using Debian or Ubuntu flavors of linux
☁️ Cloud Server Setup with owlogger
owlogger is a lightweight, web-based logging tool designed for collecting and displaying sensor data. Its typical use-case involves running on a publicly accessible cloud server that:
- ✅ Accepts and stores sensor data
- 📊 Displays real-time data on a web page
💡 Why Use a Cloud Server?
Running owlogger on a cloud server is ideal because:
- 🪶 It requires minimal system resources
- 🛠️ You’ll need admin privileges to install and configure services
- 🧩 It can coexist with other services like:
- 🛍️ E-commerce
- 🎮 Gaming
- 💾 Backup
🚀 What You’ll Learn
In this guide, we’ll walk you through:
- 💰 Cost breakdown of running a cloud server
- 🧪 Example implementations of owlogger
- 🛠️ Step-by-step setup instructions
Virtual Private Server (VPS)
What is it
Available from many vendors, a PVS is esssentially what appears to be a dedicated bare-metal computer in the cloud that is actually a guest client in a server farm.
Typically you will get:
- root access
- dedicated IP address
- easily installed base operating system (debian, ubuntu, freebsd, etc)
- defined services:
- disk space
- network bandwidth
- cpu(s)
- ram
- management console (for starting, resetting
Other services, like domain registration, ecommerce software, and backups may be available at added cost
Examples:
- Kamatera start at $4/mo for 1CPU, 20G disk, 1G ram, 5TB/mo network – more than enough for owlogger with other applications as well. This is what I use.
- Ionis as little as $2/month with different options
- Hotinger $5/mo with similar resources
Caveates
Many offers for “servers” or “web sites” do not give root access which limits your ability to add software (like owlogger). They are designed as a turnkey small business website for non-technical users and limit choices to reduce problems and support costs.
In practice
- Select base operating system, username and password
- Start server
- Note IP address
- Test access via ssh and update software
- Get a domain
- Will need subdomains like owlogger.domain.name
- Install software (git ufw caddy owlogger)
- Configure and start owlogger service
File locations
Cloud server
Database
/var/lib/owlogger/logger_data.db
Programs and modules
/usr/local/lib/owlogger/owlogger.py
/usr/local/lib/owlogger/air-datepicker.js
/usr/local/lib/owlogger/air-datepicker.css
/usr/local/lib/owlogger/owlog_user.py

/usr/bin/owlogger
/usr/bin/owlog_user
Configuration
/etc/owlogger/owlogger.toml
systemd files
/etc/systemd/system/owlogger.service
/etc/systemd/system/owlogger.timer
Caddyfile
/etc/caddy/Caddyfile
Firewall
/etc/ufw/user.rules
/etc/ufw/user6.rules
Repository copy
Depends on where git was run, but assuming you are root, in the /root directory:
/root/owlogger
Installation script
/root/owlogger/logger/log_install.sh
Sensor transmitter
Program
/usr/local/lib/owlogger/owpost.py
/usr/bin/owserver
Configuration
/etc/owlogger/owpost.toml
/etc/owfs.conf
systemd files
/etc/systemd/system/owlogger.service
/etc/systemd/system/owserver.service
Repository copy
Depends on where git was run, but assuming you are root, in the /root directory:
/root/owlogger
Installation script
/root/owlogger/post/log_install.sh
Domain
What is a domain
It’s a name for your cloud server web location. An alternative to using raw ip addresses.
- It’s more memorable
- It can be used to create SSL certificates for secure HTTPS communication
- It can refer to a new addresss if your hosting changes
How do I get one?
Domains are a thriving business, and must be purchased. Your hosting service may offer them or you can buy them from many sources.
An example using Hostinger
Typically you choose a primary domain (e.g. com, org, …) and see if the price is ok and the name you want is available.
What do I need to set up?
DNS records
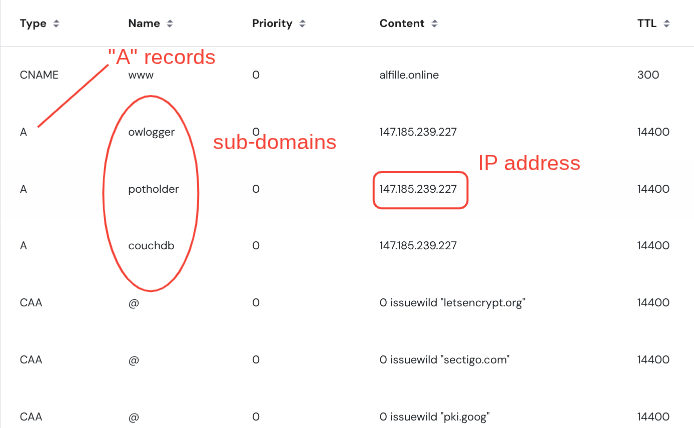
After buying a domain name, you change the DNS records to point your domain at the IP address and then create subdomains that point to the same IP address
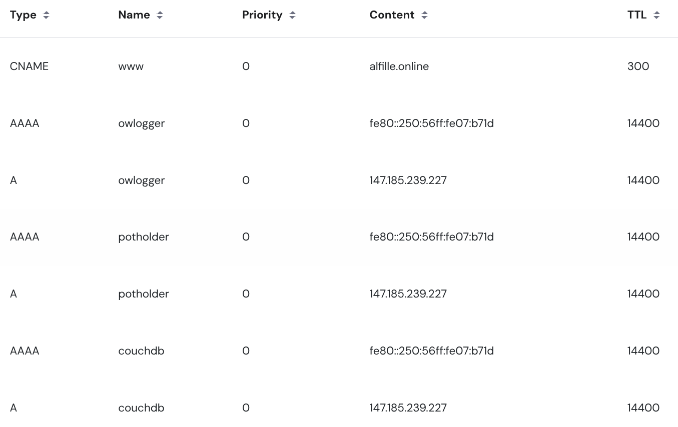
IPv4 vs IPv6
The newer IPv6 addresses should also work with owlogger and the associated prgrams (except owserver which is probably local in any case). DNS AAAA records are required,
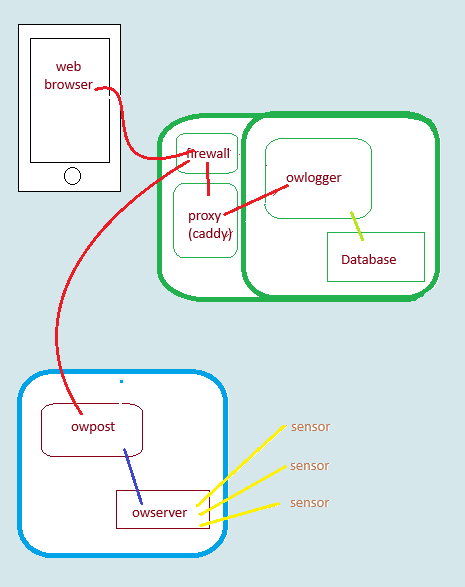
Firewall
Although not strictly needed for owlogger, good practice on any internet-accessible computer is to protect against incomming mesages with a firewall.
These are the requiremments and setting for the recommended setup with reverse-proxy and subdomains.
owlogger system requirements
owpost
- Only needs to initiate outgoing tcp connections on ports 80 (http) or 443 (https).
- owserver (the sensor source) is typically internal and within the forewall.
owlogger
data feed
- From owpost
- https (port 443) to a reverse-proxied subdomain
TLS certificate
- source “Let’s Encrypt”
- aquired and renewed by caddy
- needs tcp ports 80 and 443 open
Web browser
- https (port 443) to a reverse-proxied subdomain
Server management
Typically via ssh using tcp port 22, although some cloud hosts have a web-based console interface.
ufw
uncomplicated firewall (ufw) is easily installed on ubuntu and debian
Typical configuration (as root or sudo for each line)
apt install ufw

ufw default deny incoming
ufw default allow outgoing

ufw allow ssh
ufw allow http
ufw allow https

ufw enable # say yes
ufw status
Notes
- Make sure you finish all these before logging out, or you may be locked out!
- These settings will persist over server reboots
Reverse-proxy
What is it?
A reverse proxy takes incoming external connections and sends them to an internal service. In this case, the external connections are HTTPS protected, but the internal ones are not.
caddy
Caddy is a well documented web server (like Apache or Ngnix). Advantages:
- Built-in support for free TSL certificates (via Lets Encrypt)
- Aquires certificates automatically
- Renews certificates automatically
- Relatively light resources
- Well documented
- Simple configuration file
Caddyfile
Here is an example, using subdomains:
- Main web server: file hosting from a specific directory root
- Proxied couchdb access
- Proxied owlogger access
alfille.online {
        root * /srv/potholder
        encode gzip zstd
        file_server
}

couchdb.alfille.online
        reverse_proxy localhost:5984
}

owlogger.alfille.online {
        reverse_proxy localhost:8001
}
So Caddy serves as a protective intermediary, requiring all external access to owlogger be TSL protected
Installation
apt install caddy
More complete instructions at caddy website
systemd
What is it?
systemd is the (newish) overall linux control program for managing programs and services (like web servers)
It handles:
- Starting services (like firewall and reverse proxy)
- Getting to sequence of program starts correct
- Running programs periodically if desired
- Restarting ptograms after errors
- Logging status and problems
More information on Debian
Basic systemd commands
- status
- e.g.
systemctl status ufw.serviceshows status of ufw (firewall) - Need to press Ctrl-C to exit
- e.g.
- start | stop
- e.g.
systemctl stop caddy.serviceto stop caddy - __start__and stop state do not persist after reboot
- stop will stop the service
- restart often can stop and start, but check status since not all services manage this well
- e.g.
- enable | disable
- e.g.
systemctl enable owserver - sets the service to be started after every reboot
- Also start the service to get it started now, not just after a reboot
- disable to set the service to not start on reboot
- e.g.
ufw firewall
systemd files installed by default. No changes should be needed.
caddy reverse-proxy
systemd files installed by default. No changes should be needed.
owserver 1-wire server
systemd files installed by default.
Note that the default owserver configuration gives fake example sensors, so will need real hardware and configuration file changes (and restart of the service__) to provide more than testing input.
owpost
For the local sensor-posting machine
The install script will add the following files to /etc/systemd/system
Timer (owpost.timer)
[Unit]
Description=Run owpost periotically to send data to owlogger

[Timer]
OnBootSec=3min
OnActiveSec=15min
Unit=owpost.service

[Install]
WantedBy=timers.target
Service (owpost.service)
[Unit]
Description=Post 1-wire data from owserver to remote owlogger
After=owserver.service
Requires=owserver.service

[Service]
Type=oneshot
# With configuration file in /etc/owlogger/owpost.toml
ExecStart=/usr/bin/python3 /usr/local/bin/owpost.py
# If no configuration file
# ExecStart=/usr/bin/python3 /usr/local/bin/owpost.py -o localhost:3504 -s https://remote.host:8001
owserver
- configure owserver
- start owserver
systemctl enable owserversystemctl start owserversystemctl status owserver
- MAke sure owpost.toml file matches owserver configuration
owlogger
For the cloud server store and display program
The install script will add the following files to /etc/systemd/system
Service (owlogger.service)
[Unit]
Description=OWLogger web server
After=network.target caddy.service
Requires=caddy.service

[Service]
Type=simple
ExecStart=/usr/bin/python3 /usr/local/lib/owlogger/owlogger.py
WorkingDirectory=/usr/local/lib/owlogger
Restart=on-failure
User=www-data
Group=www-data

[Install]
WantedBy=multi-user.target
- set up caddy
- check owlogger.toml file
- start owlogger
systemctl enable owloggersystemctl start owloggersystemctl status owlogger
- Set up users if password protection is desired
OWLOGGER
What is it?
owlogger is the external portion of the system. It stores data on the cloud, and displays it on a web page.
Functional Details
- Written in python3,
- uses the http.server module for the web service
- uses the sqlite3 module for database storage
- Data is stored in an SQL file
- Security comes from reverse-proxy and passwords
- Only 3 files are recognized and served (for safety)
Operational Details
owlogger can be run directly by python3 owpython.py with options as needed, but it’s easier to have database and configuration in standard locations.
The database must be in a location known to owlog_user so that user/passwords can be managed.
Also, the port must match the reverse-proxied port of caddy
owlogger install
Debian / Ubuntu system
Basic system:
# use "sudo" for each line unless you are root
sudo apt update
sudo apt upgrade
sudo apt install git python3 python3-jwt python-bcrypt
sudo apt install ufw caddy # optional but strongly recommended
get owlogger software
git clone https://github.com/alfille/owlogger
Install
cd owlogger/logger
. log_install.sh # The initial period is needed!
Configure
See file locations
- owlogger
- edit /etc/owlogger.toml
- make sure token matches owpost
- owlog_user
- Add any users / passwords
- caddy
- edit /etc/caddy/Caddyfile
- add reverse proxy for owlogger’s subdomain
example owlogger.toml
# owlogger configuration file
# in TOML format https://toml.io/en/
#
# Normally resides in /etc/owlogger/owserver.toml
# used for owlogger.py and owlog_user.py
#

# this server location
#  for reverse-proxy protection (caddy)
server="http://localhost:8001"

# database for logging (sqlite3 format)
database="/var/lib/owlogger/logger_data.db"

# bypass passwo# Authentification token
token="simple_string"

# No passwords? (for testing)
no_password=false

# debugging output (for testing)
debug=false
From command line
Especially for testing
$ python3 logger/owlogger.py -h
usage: owlogger [-h] [--config [CONFIG]] [-s [SERVER]] [-t [TOKEN]] [-f [DATABASE]] [-d] [--no_password]

Logs 1-wire data to a database that can be viewed on the web. Works with 'owpost' and 'generalpost'

options:
  -h, --help            show this help message and exit
  --config [CONFIG]     Location of any configuration file. Optional default=/etc/owlogger/owlogger.toml
  -s [SERVER], --server [SERVER]
                        Server IP address and port (optional) default=localhost:8001
  -t [TOKEN], --token [TOKEN]
                        Optional authentification token (text string) to match with owpost or generalpost. JWT secret.
  -f [DATABASE], --file [DATABASE]
                        database file location (optional) default=./logger_data.db
  -d, --debug           Print debugging information
  --no_password         Turns off password protection

Repository: https://github.com/alfille/owlogger
owlogger setup
Functions
OWLogger has 3 functions:
- Accept data from OWPost
- Store data in a database
- Server the data to the web
Security
Additionally, there are security options for each function:
- JWT tagging of incoming data to ensure provenance
- reverse-proxy TLS layer to communications
- password gating of web access
Command line options
usage: owlogger [-h] [--config [CONFIG]] [-s [SERVER]] [-t [TOKEN]] [-f [DATABASE]] [-d] [--no_password]

Logs 1-wire data to a database that can be viewed on the web. Works with 'owpost' and 'generalpost'

options:
  -h, --help            show this help message and exit
  --config [CONFIG]     Location of any configuration file. Optional default=/etc/owlogger/owlogger.toml
  -s [SERVER], --server [SERVER]
                        Server IP address and port (optional) default=localhost:8001
  -t [TOKEN], --token [TOKEN]
                        Optional authentification token (text string) to match with owpost or generalpost. JWT secret.
  -f [DATABASE], --file [DATABASE]
                        database file location (optional) default=./logger_data.db
  -d, --debug           Print debugging information
  --no_password         Turns off password protection

Repository: https://github.com/alfille/owlogger
Config file TOML format
/etc/owlogger/owlogger.toml
# owlogger configuration file
# in TOML format https://toml.io/en/
#
# Normally resides in /etc/owlogger/owserver.toml
# used for owlogger.py and owlog_user.py
#

# this server location
#  for reverse-proxy protection (caddy)
server="http://localhost:8001"

# database for logging (sqlite3 format)
database="/var/lib/owlogger/logger_data.db"

# bypass passwo# Authentification token
token="simple_string"

rds? (for testing)
no_password=false

# debugging output (for testing)
debug=false
systemd service file
/etc/systemd/system/owlogger.service
[Unit]
Description=OWLogger web server
After=network.target caddy.service
Requires=caddy.service

[Service]
Type=simple
ExecStart=/usr/bin/python3 /usr/local/lib/owlogger/owlogger.py
WorkingDirectory=/usr/local/lib/owlogger
Restart=on-failure
User=www-data
Group=www-data

[Install]
WantedBy=multi-user.target
Note that configuration comes from the TOML configuration file rather than the command line
Reverse proxy Caddyfile setup
Simple – no other web services on the server
Here is a simple and complete Caddyfile to reverse-proxy a service running on port 8001. Caddy will automatically handle the TLS certificate for you.
Code snippet
# Caddyfile
#
# Replace "your-domain.com" with your actual domain name.

your-domain.com {
    # Forward all traffic to the local service running on port 8001
    reverse_proxy localhost:8001
}
How It Works
your-domain.com { … }: This is a site block. Caddy will listen for requests to your-domain.com.
Automatic HTTPS: Because you provided a public domain name, Caddy automatically enables HTTPS, gets a TLS certificate from Let’s Encrypt, and renews it for you. There is no extra configuration needed.
reverse_proxy localhost:8001: This is the core directive. It tells Caddy to forward all incoming web traffic to the service running on the same machine (localhost) at port 8001.
How to Use It Replace the Domain: Edit the file and change your-domain.com to your actual domain.
DNS Record: Make sure your domain’s A or AAAA DNS record points to the public IP address of the server where Caddy is running.
Firewall: Ensure your server’s firewall allows traffic on ports 80 (for the HTTP challenge) and 443 (for HTTPS).
caddy run Caddy will start, acquire the certificate, and begin serving your site over HTTPS.
More complex, more than one service
Here is a Caddyfile that reverse-proxies two different services, with Caddy automatically handling TLS certificate acquisition and renewal.
Code snippet
# Caddyfile
#
# Replace the domain names and backend ports with your actual values.

service1.example.com {
    # Forwards traffic from service1.example.com to a local service on port 8080
    reverse_proxy localhost:8080
}

owlogger.example.com {
    # Forwards traffic from owlogger.example.com to a different local service on port 8001
    reverse_proxy localhost:8001
}
How It Works
- Automatic TLS: Caddy automatically provisions and renews TLS certificates from Let’s Encrypt for any site defined with a public domain name (like service1.example.com).
- You don’t need to add any special TLS directives.
- Site Blocks: Each service is defined in its own block, starting with the domain name.
- reverse_proxy: This directive tells Caddy to forward all incoming requests for that domain to the specified backend address (ip:port).
How to Use
Create a file named Caddyfile with the content above.
Make sure your two services are running (e.g., one on port 8080, the other (owlogger) on 8001).
Prerequisites
For automatic TLS to work, you must have:
- DNS Records: An A or AAAA DNS record for both service1.example.com and service2.example.com pointing to your Caddy server’s public IP address.
- Firewall Ports: Your server’s firewall must allow inbound traffic on ports 80 and 443. Caddy uses port 80 for the TLS certificate challenge and port 443 for HTTPS traffic.
owlogger usage
Web access
owlogger can be access from any browser.
Credentials
Username and password will need to be set up on the cloud server
Details
See the full description of how to use the web page.
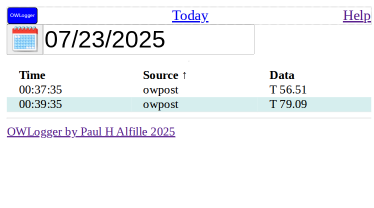
Display
This is the standard view of the owlogger web page. An explanation of all the features and controls follows.
Password
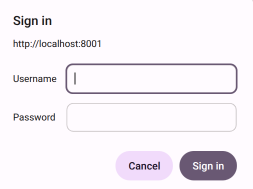
First of all, the data is password-protected.
If accessing owlogger for the first time on this device, you will be asked for your credentials.
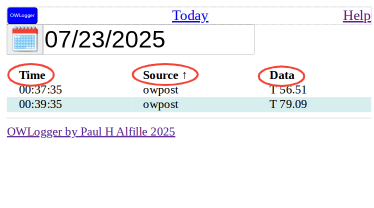
Basic page
The standard display shows a day’s sensor log.
- Time the server received the data
- Source of data (from the name you assigned owpost)
- Actual data string sent
Full page
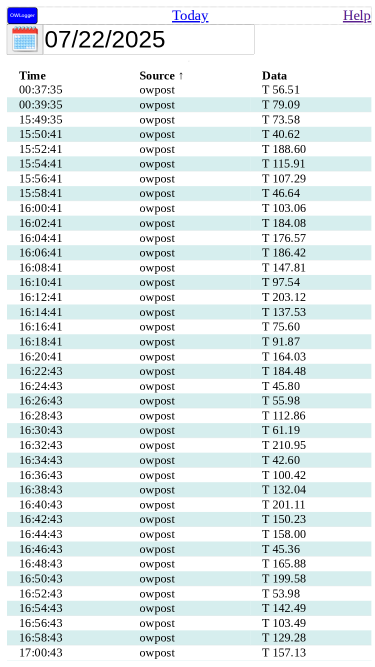
The amount of data might overflow the screen. If so, you can scroll down to see more.
Header

The top line has 3 clickable controls:
- owlogger button Refreshes this page, showing any new data
- Today jumps directly to current day
- Help opens this documentation source in another browser tab
Footer
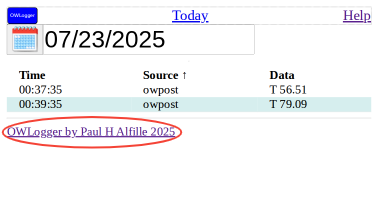
The Link and the end of the page jumps to the owlogger github repository.
Date Selection

The date chosen to view is circled here.
Pick Date
Click on the date or the calendar icon to choose another day

A month calendar is shown
- currently selected day in blue
- days with data in green
- click a day of the month to choose it
- click the month to choose another month
Pick Month
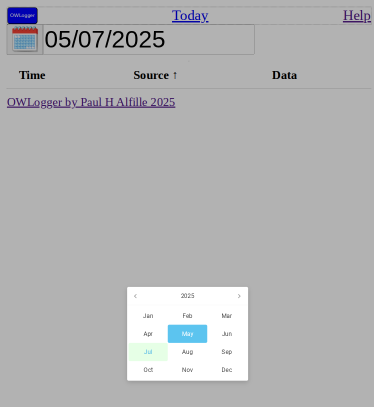
A year’s month calendar is shown
- currently selected month in blue
- months with data in green
- click on a month to select it
- click on the year to choose another year
Pick Year
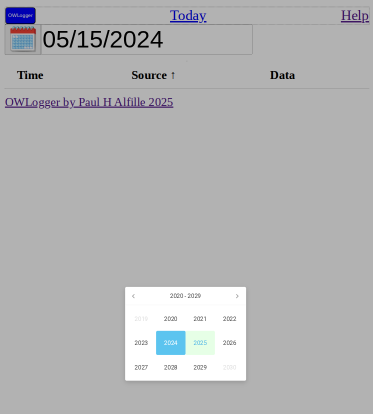
A range of years is shown
- currently selected year in blue
- years with data in green
- click on a year to select it
Data
For a given day, all the data is shown in a table:
Columns
The table columns have headers:
- Time – time owserver received tthe data
- Source – __ name given to this owpost transmitter
- Data – Actual text sent by owpost
Sorting
The column names are clickable.
- Clicking will sort the table by that column
- Clicking again will reverse the order of the search
- An arrow is shown for the sorted column
Rows
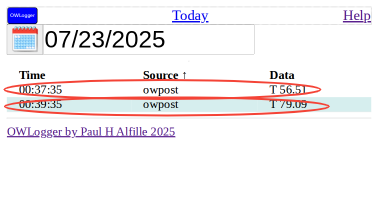
Each entry corresponds to a sensor transmission from owpost
Password protection
Is password protection needed?
With reverse-proxy protection and a firewall data communication and storage is protected.
The only remaining issue is who can read your data?
Web access
Without a paword, any =one who knows the URL (web address) can load the website and examine the sensor readings. The web access does not allow writing, nor reading files on the server.
So the question becomes, do I care who knows what readings are being stored? This divulges:
- Actual readings
- Historical readings
- Whether readings are currently being made
No_password
Turning off password protection must be actively chosen. (Security by default).
- owlogger.toml configuration:
no_password=true - owlogger.py command line:
python3 /usr/local/lib/owlogger.py --no_password
The command line takes precedence over the configuration file.
Password protection
With the default password protection, username / passwords are stored in the database. The data cannot be viewed without valid credentials.
- Passwords are stored encrypted
- The owlog_user.py program manages the usernames / passwords
- Users will be prompted to enter the password the first time accessing the data from a given location
OWLOG_USER
Purpose
owlog_user manages usernames and passwords for web access to owlogger.
Command line
owlog_user is a command line program that runs on the same computer as owlogger.
- Same configuration file:
/etc/owlogger/owlogger.toml - Same sqlite3 database:
/var/lib/owlogger/logger_data.db - Same location for the python file:
/usr/local/lib/owlogger/owlog_user.py - The installation script creates
owlog_userin/usr/binas an easier was to run the program
Options
usage: owlog_user.py [-h] [--config [CONFIG]] [-f [DATABASE]] [-l] [-r] username

Add users and passwords to database for `owlogger` security

positional arguments:
  username              Username to add, update or remove

options:
  -h, --help            show this help message and exit
  --config [CONFIG]     Location of any configuration file. Optional default=/etc/owlogger/owlogger.toml
  -f [DATABASE], --file [DATABASE]
                        database file location (optional) default=./logger_data.db
  -l, --list            List users registered in database
  -r, --remove          Remove user from this database

Repository: https://github.com/alfille/owlogger
Adding/updating a user
$ owlog_user paul
Password for paul:
Note:
- Passwords are store encrypted (bcrypt) in the database
- Passwords cannot be retrieved, only overwritten.
- There are no restrictions on password content
- usernames must be unique
- Use quotation marks if username containes spaces. e.g.: `owlog_user “paul alfille”
Listing users
$ sudo owlog_user --list
paul
paul alfille
Remove a user
$ owlog_user -r paul

$ owlog_user -l
paul alfille
Implementation (informational, not important)
The database has a userlist table
sqlite> .dump userlist
PRAGMA foreign_keys=OFF;
BEGIN TRANSACTION;
CREATE TABLE userlist (
                username TEXT PRIMARY KEY,
                password_hash TEXT NOT NULL
            );
INSERT INTO userlist VALUES('paul alfille','$2b$12$x81g2MvcVs2TogTKKy5sjuPCTwiaQ2y9kTeVljDgOvOg9fcm8hh2i');
COMMIT;
OWPOST
owpost install
owpost setup
owpost usage
1-wire
owserver
owserver is part of the One Wire File System.
It connects to 1-wire controllers (of almost any kind) and transmits reading over the network using a special protocol.
Although the original (very complete) documentation is availble on the old site, current development is here.
Installation
debian or ubuntu
apt install owserver
RPM (fedora, suse, redhat..)
package `owfs-server``
Source
C program needs standard autoconf automake, etc
Configuration
owserver will run as a systemd service (althoug it can run directly from the command line)
Configuration at /etc/owfs.config
Typical steps:
- attach a 1-wire device
- install owserver
apt install owserver
- edit
/etc/owfs.confto match your setup
- server address
localhost:4304 - device type (usb, serial, w1, etc)
- Start service
systemctl start owserver
systemctl enable owserver
systemctl status owserver
- Testing:
apt install owshell
owdir -s localhost:4304
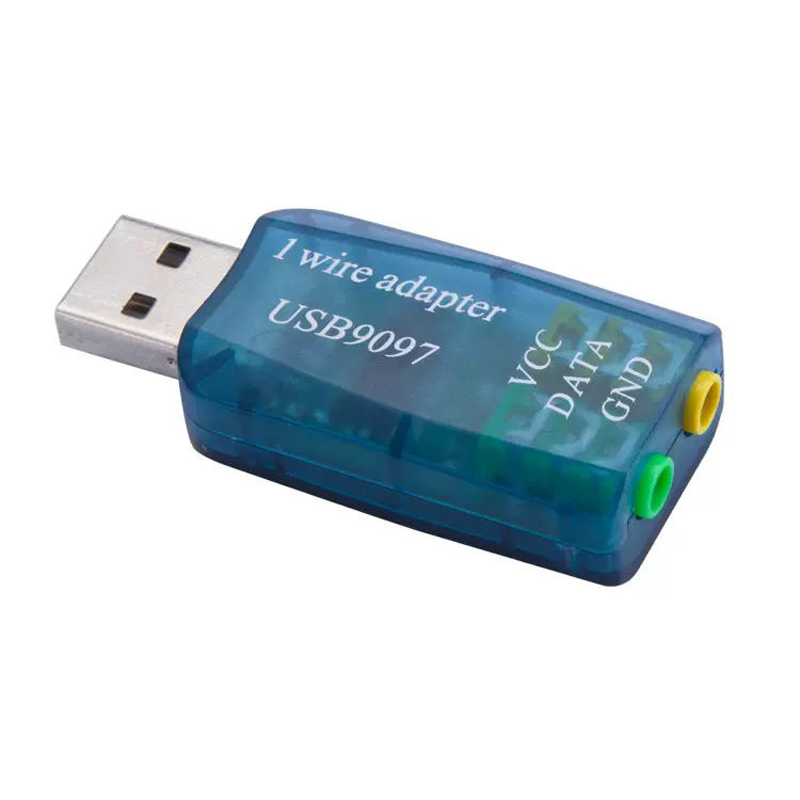
USB
Serial
The serial port can be used as a one-wire adapter, with the timing and pulses and power generated by the serial port, or with a separate device that simulates a serial port (often with USB connection to the computer).
Example implementation
Sensor
We’ll use the PCSensor product.
Raspberry Pi
In this case, a Pi 3B (64bit)
- Install Raspberry Pi OS Any version works
- Configure network (wifi or wired)
Either from raspberry installer before creating SD card, or vianetwork manager - Install software packages
sudo apt install git python3 python3-jwt python3-bccrypt owserver ow-shell
- Obtain and install owlogger
git clone https://github.com/alfille/owlogger
cd owlogger
sudo sh all_install.sh
Note the owlogger service will complain about no caddy service. That’s ok. We’re not going to run owlogger. 5. Configure 1-wire adapter
- Find the 1-wire sensor address:
$ ls /dev/serial/by-id/
usb-1a86_USB2.0-Serial-if00-port0
- edit
/etc/owfs.conf
Change:
server: FAKE = DS18S20,DS2405
To
server: device = /dev/serial/by-id/usb-1a86_USB2.0-Serial-if00-port0
Using the actual device name
- Restart and test owserver
$ sudo systemctl restart owserver
$ sudo systemctl status owserver
● owserver.service - Backend server for 1-wire control
     Loaded: loaded (/lib/systemd/system/owserver.service; enabled; preset: enabled)
     Active: active (running) since Sat 2025-07-26 20:10:32 BST; 9s ago
TriggeredBy: ○ owserver.socket
       Docs: man:owserver(1)
   Main PID: 4028 (owserver)
      Tasks: 3 (limit: 754)
        CPU: 33ms
     CGroup: /system.slice/owserver.service
             └─4028 /usr/bin/owserver --foreground -c /etc/owfs.conf

Jul 26 20:10:31 owpost3B systemd[1]: Starting owserver.service - Backend server for 1-wire control...
Jul 26 20:10:32 owpost3B systemd[1]: Started owserver.service - Backend server for 1-wire control.
$ owdir
/28.C8C3F4020000
/bus.0
/uncached
/settings
/system
/statistics
/structure
/simultaneous
/alarm
- Configore cloud server location and settings in
/etc/owlogger/owpost.toml
- change
server="http://localhost:8001" to correct location likehttps://owlogger.alfille.online` - change
nameif you wish - change
tokento match cloud server setting
- Configure repeat time in
/etc/systemd/system/owpost.timer - Start monitoring!
sudo systemctl GPIO direct hardware
1-wire devices can be wired directly to the pins of a raspberry pi, although a 4.7kΩ resistor is also needed.
w1
Typically managed by linux operative system w1 module
owserver --w1
Network
ESP32
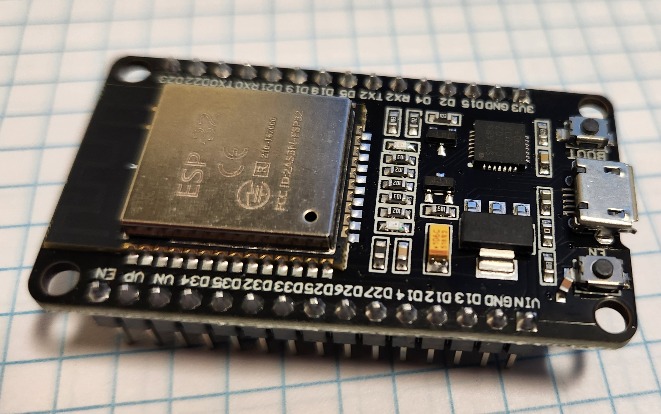
ESP32
Basically the ESP32 can serve as an alternative to owpost.
The ESP32 family of chips has on-board wifi and GPIO pinds that can serve as a 1-wire bus master.
The device is not as powerful as a Raspbaerry Pi
- Minimal operating system (no Linux)
- Does not support owserver (or the owfs ecosystem)
- Uses a subset of python (micropython) which fortunately covers our uses
- Lower power, lower cost
Hardware
The
Micropython
There are a number of tutorials on installing micropython on the ESP32. The official documentation is excellent and has the firmware download links.
install esptool
Due to a problem in the distribution version of esptool (`sudo apt install esptool) on Ubuntu 24.04 I needed to perform:
sudo apt install python3-pip
pip install --break-system-packages esptool
The actual program will be in ~/.local/bin whih needs to be in your PATH (e.g. export PATH="$PATH:~/.local/bin"
install firmware
esptool erase_flashesptool write_flash 0x1000 ESP....
Software
Use mpremote to talk to ESP device
Install mpremote
pip install mpremote
Modules
Built in
- machine
- os
- time
- onewire, ds18x20
- network
- urequests
External modules
- tomli
- micropython version
- Using suggested shortcut with no datetime needed of _parser.py -> tomli.py
- jwt and hmac
- From Miguel Grinberg
ADVANCED
Database
Logged messages are stored in a database on the owlogger server in SQL format. The implementation is very simple.
Does it matter?
Knowing the actualy database internals is not required for using owlogger effectively. This information may be useful for:
- developing add-on functionality to the system
- doing more advanced data manipulation of analysis
Otherwise, consider this part of the documentation as optional
database file
sqlite3format- named
logger_data.dbby default - A different filename can be chosen with the -d command line option
- placed in
/var/lib/owloggerif you use the installation script - the file will be automatically created if it doesn’t exist
table
- the table holds the data
- only one table is needed
- named
datalog - Created automatically if it doesn’t exist
- Simple schema:
| Field | Type | Comment |
|---|---|---|
| id | integer | unique key (required, not used) |
| data | datetime | timestamp of when entry created |
| value | text | logged data text |
In sqlite3:
$ sqlite3 logger_data.db
SQLite version 3.40.1 2022-12-28 14:03:47
Enter ".help" for usage hints.
sqlite> .tables
datalog
sqlite> .dump datalog
PRAGMA foreign_keys=OFF;
BEGIN TRANSACTION;
CREATE TABLE datalog (
                id INTEGER PRIMARY KEY,
                date DATATIME DEFAULT CURRENT_TIMESTAMP,
                value TEXT
            );
COMMIT;
indexes
- Primary index:
id- required
- unique
- generated automatically
- not used directly
- Secondary index:
idx_date- indexes field
date - not (necessarily) unique
- created if not present
- used for performance
- indexes field
sqlite> .indexes datalog
idx_date
Queries
Create table
            CREATE TABLE IF NOT EXISTS datalog (
                id INTEGER PRIMARY KEY,
                date DATATIME DEFAULT CURRENT_TIMESTAMP,
                value TEXT
                );
Create index
CREATE INDEX IF NOT EXISTS idx_date ON datalog(date);
Data for this day
            SELECT TIME(date) as t, value FROM datalog
               WHERE DATE(date) BETWEEN DATE(?) AND DATE(?)
               ORDER BY t;
Days with any data in a range
            SELECT DISTINCT DATE(date) as d FROM datalog
               WHERE DATE(date) BETWEEN DATE(?) AND DATE(?)
               ORDER BY d;
Months with any data (this year)
            SELECT DISTINCT strftime('%m', date) AS m FROM datalog
               WHERE strftime('%Y', date)=?
               ORDER BY m;
Years with any data
            SELECT DISTINCT strftime('%Y', date) AS y FROM datalog
               ORDER BY y;
Accessing data
Python
Access directly with built-in python sqlite3 module
Web interface
owlogger provides a native web interface. default port:8001
Command line
sqlite3 official, rather bare-bones command line tool. Example:
sqlite> .tables
datalog
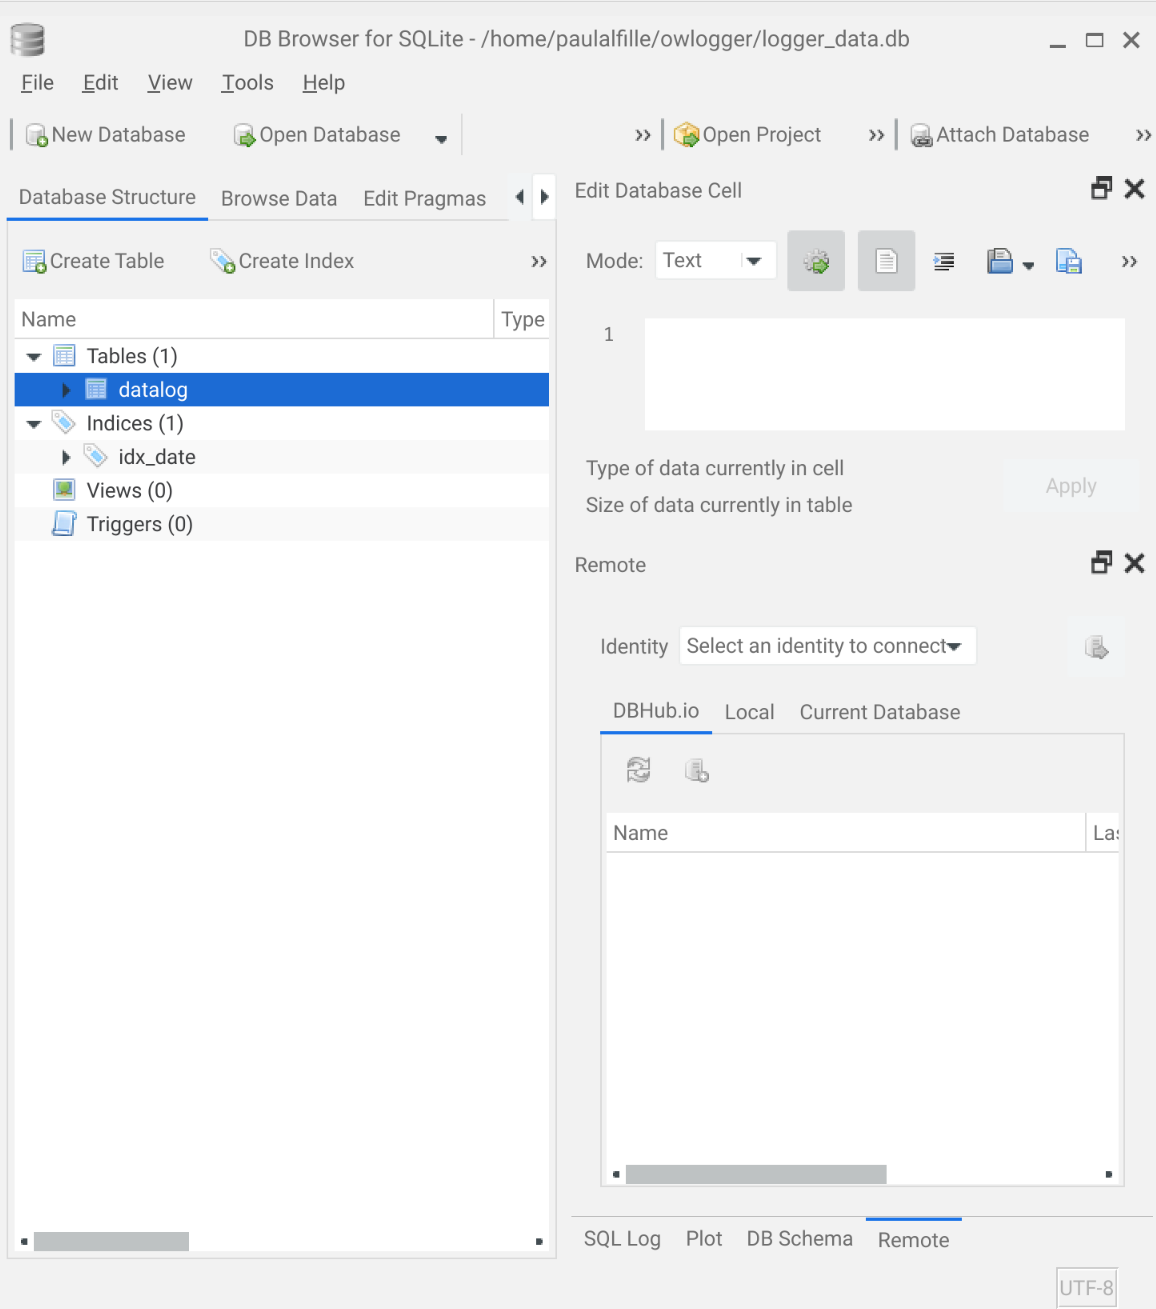
Graphical
DB browser for sqlite is cross-platform and pretty intuitive
Customize
DETAILS
Credit and Acknowledgment
owlogger is a system of multiple components, and leverages several open-source projects:
Python
Python3, and many modules:
- The standard lib: argparse, datetime, http.server, io.BytesIO, json, math, os, sys, time, urllib, urllib.parse
- Also the standard database module: sqlite3
- The requests module for sending data to a remote server
pyownet
- pyownet by Stefanno Micccoli is python module that communicates directly woth owserver. The version here is slightly modified.
- update to Python3
- use f-string formatting
- included directly in the owlogger repository
owserver
Part of the owfs – 1-wire file system maintained by a group of developers.
1-wire
1-wire is a simple protocol for communication with external enumerated devices, like memory, temperature and voltage. The protocol actually uses 2 wires, but data and power are combined on a simegle line that multiple sensors can share. Originally Designed by Dallas Semiconductor, it’s now produt of Analog Devices
Javascript
Basic code is embeddd in owlogger but a nice calendar function comes from air-datepicker by T1m0n (Timofey).
The air-datepicker code is slightly modified to default to english text and hosted directly in this repository.
caddy
Best practice is to use a reverse-proxy in frnt of owlogger likw caddy by Matt Holt
firewall
ufw is used by Debian and Ubuntu and helps limit external attacks.
sqlite3
The database used is the sqlite3 library by D Richard Hipps. Not only is it imbedded in python, but it can be used as stand-alone program on the database file.
mdbook
This documentation on owlogger os arranged using mdbook – a documentation system from the Rust Language project.
Security
General Notes
owlogger is a systems of components, so the security aspect needs to be analyzed in parts. In general, this collects low-value data, so collateral damage is a consideration.
Programs
Best practice:
owserver
Well tested. Read-only of data from physical sensors. communication is via owserver protocol but typically will be internal to the posting station.
owpost
Send-only externally, potentially via https if a reverse proxy is employed.
owlogger
Uses http.server python module, which is advertised as not hardened. The accepted HTTP messages are restricted, specifically no arbitrary file reading or external program use. Using a reverse proxy to keep communication internal is advisable, however.
Browser
Data on the display device is performed via HTML with a non-persistent javascript component. The air-datepicker module is used, but not loaded from an external source.
Logging data
Encryption
Data is sent in clear text via http by default. Using https by adding a proxy agent (e.g. caddy) to the server is easily accomplished and implementation of that scheme is detailed.
Injection
All data is logged by default, potentially including malicious spam. A simple form of authentification using an arbitrary text string (token) is available. This only makes sense if the traffic is also encrypted. This token must be added at both ends at startup and requires that both ends are secure from inspection.
Access to data
Access (to owlogger web display) is read-only, but web-available – the point of the system. Communication is via http by default.
Encryption
https (TLS encryption) is easily added with a proxy agent (e.g.caddy) and implementation of that is encouraged and detailed with design and scripts.
Authentification
Authetification for access is not implemented.
Database
The database is stored on the server, and so requires that the server’s file system is not compromised.
- Data entry is via sqlite3 with protection against SQL injection attack
- Data is managed in a write-only mode
- There is a potential for spam data to be sent to the system, filling up the file space (see tokens).
Physical
Phyisical access, compromise and damage is generally out of scope.
data collectors
Sensors, wires and the owputter component may be in a vulnerable area to intentional or unintentional damage, so robust installation is advisable. These components are generally inexpensive, fortunately.
License
There are several components used (but included directly) with slightly different licences.
Summary
Open source, and may be employed as you wish. Licensing cannot change. Some parts require that distributing derived software must also offer the source code be available
Details
owlogger.py owpost.py
MIT license – basically code may be used for any purpose, but should stay under that license and offers no warrantees.
air-datepicker
pyownet
LGPL-3.0 – read the details here.
So the licensing is quite permissive. Treating the entirety as LGPL-3.0 is probably the safest course, but the individual components are licensed as stated above.
Repository
owlogger source code is available in a github repository
- The Issues tab is a good place to ask questions and report problems.
- Skilled coders can fork the code, and hopefully offer useful additions back in Pull requests
- This documentation is also in the repository
- Markup files in the
/srcdirectory - Uses mdbook
- Markup files in the
Support
Issues tab
The best place to bring questions, issues and plaudits is the issies tab of the owlogger github site.
Open Source
As for any free open-source program the avenues for assistance are:
- The on-line forum (in this case the issues tab noted above
- Experimentation and looking at the source code
Of course there is no guarantee that help will be available or timely, but help courteous people use your creation is one of the rewards of oen-source software.
owfs and python
The author’s expertise is the owfs system (he’s the original author) and the specific python programs used here. Some of hte other components (python modules, caddy, TSL certificates) may need to be answered elsewhere.